Chapter 7. Configuring and Building eCos from Source
Table of Contents
This chapter documents the configuration of eCos. The process is the same for any of the supported targets: you may select a hardware target (if you have a board available), any one of the simulators, or a synthetic target (if your host platform has synthetic target support).
7.1. eCos Start-up Configurations
There are various ways to download an executable image to a target board, and these involve different ways of preparing the executable image. In the eCos Hardware Abstraction Layer (HAL package) there are configuration options to support the different download methods. Table 7.1, “Configuration for various download methods” summarizes the ways in which an eCos image can be prepared for different types of download. This is not an exhaustive list, some targets define additional start-up types of their own. Where a ROM Monitor is mentioned, this will usually be RedBoot, although on some older, or low resource, targets you may need to use the GDB stubs ROM or BootUp, see the target documentation for details.
Table 7.1. Configuration for various download methods
| Download method | HAL configuration |
|---|---|
| Burn hardware ROM | ROM, ROMRAM or JTAG start-up |
| Download to ROM emulator | ROM or ROMRAM start-up |
| Download to board with ROM Monitor | RAM start-up |
| Download to simulator without ROM Monitor | ROM start-up |
| Download to simulator with ROM Monitor | RAM start-up |
| Download to simulator ignoring devices | SIM configuration |
| Run synthetic target | RAM start-up |
![[Caution]](pix/caution.png) | Caution |
|---|---|
You cannot run an application configured for RAM start-up on the simulator directly: it will fail during start-up. You can only download it to the simulator if you are already running RedBoot in the simulator, as described in the toolchain documentation or you load through the SID GDB debugging component. This is not the same as the simulated stub, since it does not require a target program to be running to get GDB to talk to it. It can be done before letting the simulator run or you use the ELF loader component to get a program into memory. |
![[Note]](pix/note.png) | Note |
|---|---|
|
The debugging environment for most developers will be either a hardware board or the simulator, in which case they will be able to select a single HAL configuration.
7.2. Configuration Tool on Windows and Linux Quick Start
This section described the GUI based configuration tool. This tool is probably more suited to users who prefer GUI's. The next section describes a CLI based tool which Unix users may prefer.
Note that the use of the Configuration Tool is described in detail in Part III, “The eCos Configuration Tool”.
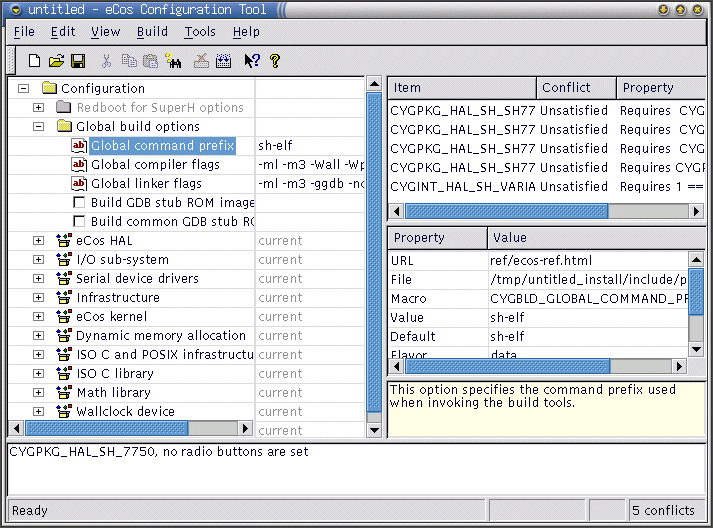
The Configuration Tool (see Figure 7.1, “Configuration Tool”) has five main elements: the configuration window, the conflicts window, the properties window, the short description window, and the output window.
Figure 7.1. Configuration Tool
Start by creating a new configuration for the default target and template of your installation and profile from the file menu → (Ctrl+N).
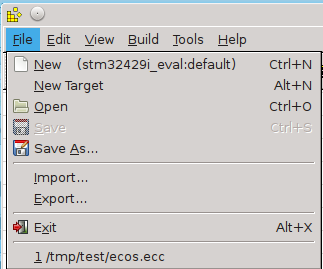
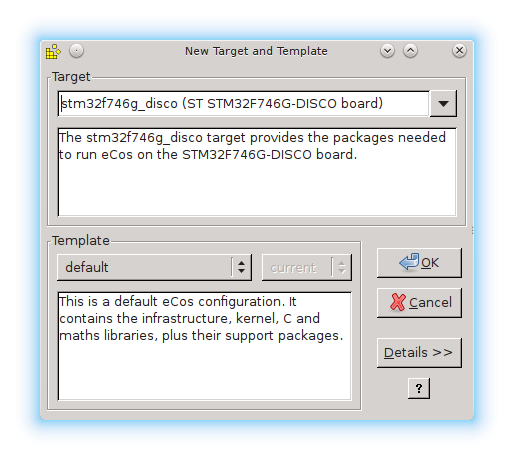
If you wish to select a different target and/or template, select from the file menu → (Alt+N) as illustrated in Figure 7.2, “File Menu” and the dialog illustrated in Figure 7.3, “Target and Template selection” will be displayed.
Figure 7.3. Target and Template selection
![[Note]](pix/note.png) | Note |
|---|---|
This method of switching differs from versions prior to eCosPro 4.0 where users were instructed to use the Template Dialog through the menu → (Ctrl+M). From version 4.0 this dialog is now only used to change the template of the current target and configuration. To switch an existing configuration to a different target see Section 15.2, “Switching Targets, Repositories and Versions”. |
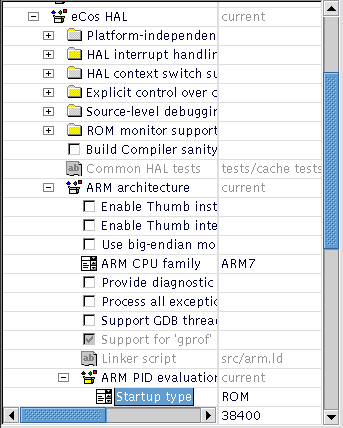
Make sure that the configuration is correct for the target in terms of Startup type and verify endianness, CPU model, etc. (see Figure 7.4, “ Configuring for the target”).
Figure 7.4. Configuring for the target
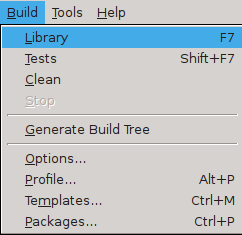
Next, select the
→ (F7) menu
item to start building eCos
(see Figure 7.5, “Selecting the Build Library menu item”). The
application will configure the sources, prepare a build tree, and
build the libtarget.a library, which contains the
eCos kernel and other packages.
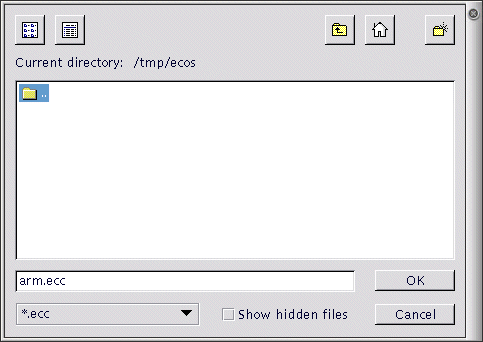
The Save As dialog box will appear, asking
you to specify a directory in which to place your save file. You
can use the default, but it is a good idea to make a subdirectory,
for example $HOME/ecos-work.
![[Caution]](pix/caution.png) | Caution |
|---|---|
For historic reasons, due to prior limitations on Windows you are advised not to use spaces in filenames, directories or paths. |
Figure 7.6. Save file dialog
When you build an eCos library the
build (
TARGET-gcc) and
host tools set by the Profile will be used. A set
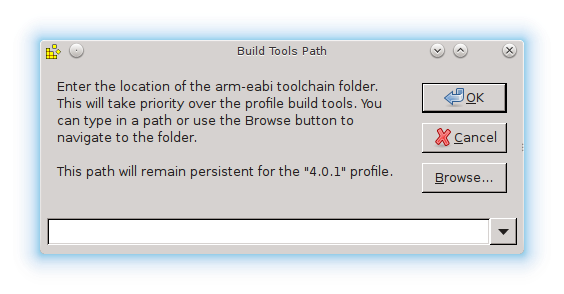
of user-defined build tools may be selected, using
→ → , to take precedence over
these using the Build Tools dialog box as shown in
Figure 7.7, “Build tools dialog”. You can select a location
from the drop down list, browse to the directory using the
Browse button, or type in the location of the build
tools manually. As the build tools are architectural, this user-defined
path will remain attached to the profile that was active when the path
was set. When the profile is changed, this will change to the value
previously associated with the new profile.
Figure 7.7. Build tools dialog
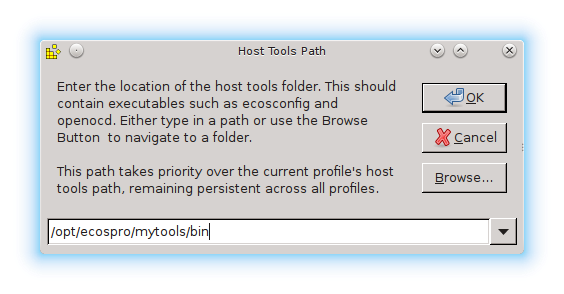
Similarly, a set of user-defined Host Tools may take precedence over the Profile's Host Tools using → → (for commands such as make, cat and ls on Windows hosts and openocd on both Linux and Windows hosts) using the Host Tools dialog box shown in Figure 7.8, “Host tools dialog”. As with the Build Tools dialog, you can select a location from the drop down list, browse to the directory using the Browse button, or type in the location of the user tools manually. However, unlike the user-defined Build Tools, the user-defined Host tools are not associated with any Profile and will remain persistent between Profile's and different invocations of the eCos Configuration Tool.
Figure 7.8. Host tools dialog
![[Note]](pix/note.png) | Note |
|---|---|
Both the Build Tools and User Tools form part of an eCosPro Profile so it is not normally necessary on eCosPro installations to enter paths to either tools. If you do enter paths for either, these will take preference to the Build and User Tools of the selected profile. In addition, on Linux, specifying Host Tool will often be unnecessary as the tools will already be on your PATH. |
When a build has been invoked, the Configuration
Tool configures the sources, prepares a build tree, and
builds the libtarget.a library into an install tree,
which contains:
the eCos kernel (
libtarget.alibrary) and other libraries or packagesthe include files to be referenced by the sources of your application
eCos configuration segments (
.ecmfiles) that may be imported into the eCos configuration to enable a specific kernel, library or package behaviourhost tool configuration files which may be used by Eclipse, the eCos Configuration Tools or developer to either run or debug both tests and your application
The build tree will be created in the same directory the saved
configuration (.ecc file) is located and will be
given the same name as the configuration file, without the
.ecc extension, and postfixed with
_build. Similarly, the install tree will be
created in the same directory as the saved configuration and build
tree but will be postfixed with _install.
For example, if you create a configuration file
myconfig.ecc in the directory
C:\PlayPit, after a successful build you will have
the following configuration file and its associated build and install
subdirectories in C:\PlayPit
myconfig.eccmyconfig_buildmyconfig_install
The output from the configuration process and the building
of libtarget.a will be shown in the output
window.
Once the build process has finished you will have a kernel
with other packages in the file libtarget.a
located within the lib subdirectory of your
install tree. You should now build the
eCos tests for your particular
configuration.
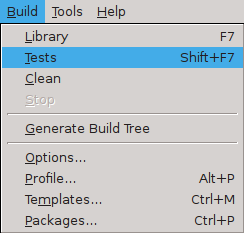
You can do this by selecting → (Shift-F7). Notice that you could have selected Tests instead of Library in the earlier step and it would have built both the library and the tests, but this would increase the build time substantially, and if you do not need to build the tests it is unnecessary.
Figure 7.9. Selecting the Build Tests menu item
Chapter 8, Running an eCos Test Case will guide you through running one of the test cases you just built on the selected target, using GDB.
7.3. ecosconfig on Windows and Linux Quick Start
As an alternative to using the graphical Configuration Tool, it is possible to configure and build a kernel by editing a configuration file manually and using the ecosconfig command. Users with a Unix background may find this tool more suitable than the GUI tool described in the previous section.
Manual configuration and the ecosconfig command are described in detail in Chapter 26, Manual Configuration.
To use the ecosconfig command you need to start a shell. In Windows you need to start a DOS command line or Shell Environment. For eCosPro installations on Windows earlier than eCosPro 3.1, you need to start a CygWin bash shell. These may also be obtained using the menu item → of the GUI eCos Configuration Tool.
eCosPro installations will include Desktop menu entries for the Shell
Environment for both Linux and Windows that will also set up the paths to
user-defined build and user tools, as well as the tools defined by the
eCosPro profiles. If you have multiple eCosPro installations or profiles,
you will be prompted to select a Profile into which the Shell Environment
is to be configured. This initialises the PATH environment
variables and sets up the eCos specific environment variables, such as
ECOS_REPOSITORY, as well as the
OPENOCD_SCRIPTS, ECOS_INSTALL_DIR
and ECOSPRO_PROFILE variables as described
in Section 11.2, “Environment Variables”.
The following instructions assume that the PATH
and ECOS_REPOSITORY environment variables have been
set up correctly. These instructions also assume Linux usage but can be
applied equivalently to Windows.
Before invoking ecosconfig you need to choose a
directory in which to work. For the purposes of this tutorial, the
default path will be
(e.g.
<BASE_DIR>
) Create
this directory and change to it by typing: $HOME/ecos-work
$ mkdir<BASE_DIR>$ cd<BASE_DIR>
To see what options can be used with ecosconfig, type:
$ ecosconfig --help
The available packages, targets and templates may be listed as follows:
$ ecosconfig list
Here is sample output from ecosconfig showing the usage message.
Example 7.1. Getting help from ecosconfig
$ ecosconfig --help --config-help
Usage: ecosconfig [ qualifier ... ] [ command ]
  commands are:
    list [ packages | templates | targets ]  : list repository contents
    new TARGET [ TEMPLATE [ VERSION ] ]      : create a configuration
    target TARGET                            : change the target hardware
    template TEMPLATE [ VERSION ]            : change the template
    add PACKAGE [ PACKAGE ... ]              : add package(s)
    remove PACKAGE [ PACKAGE ... ]           : remove package(s)
    packages [ loaded | active ]             : list configuration packages
    attributes [ ATTRIBUTE ... ]             : list configuration attributes
    present PACKAGE [ PACKAGE ... ]          : check presence of package(s)
    version VERSION PACKAGE [ PACKAGE ... ]  : change version of package(s)
    export FILE                              : export minimal config info
    import FILE                              : import additional config info
    check                                    : check the configuration
    resolve                                  : resolve conflicts
    tree                                     : create a build tree
    <configuration command>                  : get or set a configuration option
                                             : use --config-help for more details
  qualifiers are:
    --config=FILE                            : the configuration file
    --prefix=DIRECTORY                       : the install prefix
    --srcdir=DIRECTORY                       : the source repository
    --builddir=DIRECTORY                     : the build tree directory (default: cwd)
    --no-resolve                             : disable conflict resolution
    --version                                : show version and copyright
    -q, --quiet                              : reduce verbosity
    -v, --verbose                            : increase verbosity
    -l, --long                               : full/long list format
    -i, --ignore-errors                      : ignore unresolved conflicts
    -n, --no-updates                         : read-only mode, do not modify the file system
    -c, --compat                             : GUI configtool compatibility
    --enable-debug                           : enable debugging in this configuration
    --disable-debug                          : disable debugging in this configuration
    --help                                   : display this message
    --config-help                            : display configuration commands

Configuration commands are:
  set_comment `COMMENT'                : set comment to COMMENT
  add_comment `COMMENT'                : append COMMENT to comment
  get_comment                          : output the comment
  get_enabled <PACKAGE|OPTION>         : output 0 or 1 if PACKAGE or boolean OPTION is enabled
  set_enabled <PACKAGE|OPTION> <0|1>   : enable (1) or disable (0) PACKAGE or boolean OPTION
  get_value OPTION                     : output the value of cdl OPTION
  set_value OPTION VALUE               : set the value of cdl OPTION to VALUE
  get_legal_values OPTION              : output the legal values of cdl OPTION
$
Example 7.2. ecosconfig output — list of available packages, targets and templates
$ ecosconfig list Package CYGPKG_CYGMON (CygMon support via eCos): aliases: cygmon versions:<version>Package CYGPKG_DEVICES_WALLCLOCK_DALLAS_DS1742 (Wallclock driver for Dallas 1742): aliases: devices_wallclock_ds1742 device_wallclock_ds1742 versions:<version>Package CYGPKG_DEVICES_WALLCLOCK_SH3 (Wallclock driver for SH3 RTC module): aliases: devices_wallclock_sh3 device_wallclock_sh3 versions:<version>Package CYGPKG_DEVICES_WATCHDOG_ARM_AEB (Watchdog driver for ARM/AEB board): aliases: devices_watchdog_aeb device_watchdog_aeb versions:<version>Package CYGPKG_DEVICES_WATCHDOG_ARM_EBSA285 (Watchdog driver for ARM/EBSA285 board): aliases: devices_watchdog_ebsa285 device_watchdog_ebsa285 versions:<version>…
7.3.1. Selecting a Target
To configure for a listed target, type:
$ ecosconfig new <target> [<template>]
The <template> is optional and if none is specified, the default template will be used. For example, to configure for the ST Micro 32F429IDISCOVERY development board, type:
$ ecosconfig new stm32f429i_disco
You can then edit the generated file,
ecos.ecc, setting the options as required for the
target (endianess, CPU model, Startup type, etc.). For detailed
information about how to edit the ecos.ecc file,
see the CDL Writer's Guide and
Section 26.8, “Editing an eCos Savefile”.
To create a build tree for the configured target in the current
directory where ecos.ecc is located by type:
$ ecosconfig tree
You can use the --builddir to specify a directory
for the build tree to be located, other than the current directory, as
well as the --config option to specify a path to the
configuration file if it is different from ecos.ecc
or not in the current directory.
If there are any problem with the configuration,
ecosconfig will tell you. The most likely cause of
this is mistakes when editing the ecos.ecc file.
You can check whether the configuration you have made is correct,
without building the tree with the following command:
$ ecosconfig check
If this reports any conflicts you can get ecosconfig to try and resolve them itself by typing:
$ ecosconfig resolve
See Section 26.3, “Conflicts and constraints” for more details.
You can now run the command make or
make tests, after which you will be at a similar
point you would be after running the Configuration
Tool. The library and header files will be in the
install subdirectory of the current working
directory (unless of course the option --prefix is
provided to the ecosconfig tree command to specify
the path to the install directory). You can now start developing your
own applications, following the steps in
Chapter 9,
Building and Running Sample Applications.
![[Note]](pix/note.png) | Note |
|---|---|
The build and install directory layout differ between the
eCos Configuration Tool and
ecosconfig for historic reasons.
You can make ecosconfig use the same layout and
naming convention as the eCos Configuration Tool
by including the |
The procedure shown above allows you to do very coarse-grained configuration of the eCos kernel: you can select which packages to include in your kernel, and give target and start-up options. But you cannot select components within a package, or set the very fine-grained options.
To select fine-grained configuration options you will need to
edit the configuration file ecos.ecc in the
current directory and regenerate the build tree.
![[Caution]](pix/caution.png) | Caution |
|---|---|
You should follow the manual configuration process described above very carefully, and you should read the comments in each file to see when one option depends on other options or packages being enabled or disabled. If you do not, you might end up with an inconsistently configured kernel which could fail to build or might execute incorrectly. |
| 2025-10-02 | Open Publication License |


