Chapter 15. The Configuration
Table of Contents
15.1. Adding and Removing Packages
To add or remove packages from the configuration, select → (Ctrl+P). The following dialog box will be displayed:
Figure 15.1. Packages dialog box
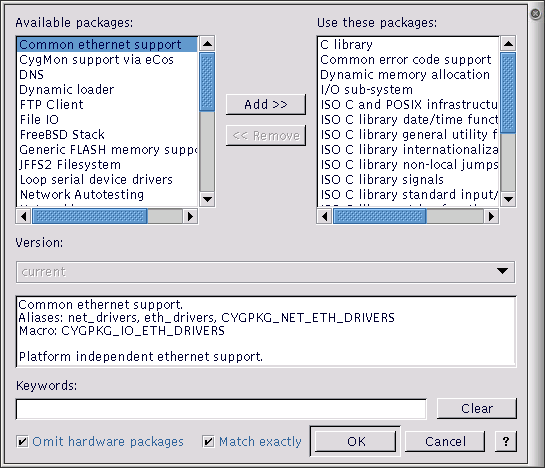
The left-hand list shows those packages that are available to be loaded. The right-hand list shows those that are currently loaded. In order to transfer packages from one list to another (that is, to load or unload packages) double-click the selection or click the Add or Remove buttons.
The version drop-down list displays the versions of the selected packages. When loading packages, this control may be used to load versions other than the most recent (current). Note that if more than one package is selected, the version drop-down list will display only the versions common to all the selected packages.
The window under the version displays a brief description of the selected package. If more than one package is selected, this window will be blank.
Under the description window there is a Keywords control into which you can type a string to be matched against package names, macro names and descriptions. The lists are updated a second or so after typing has stopped. If you type several separate words, all of these words must be associated with a given package for that package to be displayed. If you select the Match exactly checkbox, then the string is taken to be a complete fragment and matched against the beginning of a name, macro name or descriptions. All matches are done case-insensitively.
If you check Omit hardware packages, only non-hardware packages will be shown.
15.2. Switching Targets, Repositories and Versions
To migrate an eCos configuration to a different target, version of eCosPro, or repository, the following steps should be followed:
Export the existing configuration to an
.ecmfile.Confirm the target and template set in the existing configuration using the Repository Information dialog illustrated in Figure 15.7, “Repository and Configuration Information dialog box”. → (Ctrl+I)
If applicable, switch to the new version, repository or profile using the file menu: → (Alt+P).
Create a new configuration by selecting the new target (if applicable) and template, selecting same template as the original configuration → (Alt+N) illustrated in Figure 7.3, “Target and Template selection”.
Set the hardware template and the packages template to the originals determined above.To select a hardware template, choose from the first drop-list. To choose a packages template, choose from the second. Brief descriptions of each kind of template are provided in the corresponding edit boxes.
Import the original configuration from the exported
.ecmfile create in the first step above.Resolve conflicts, if any.
Save the configuation.
![[Note]](pix/note.png) | Note |
|---|---|
|
15.3. Platform Selection
To add, modify or remove entries in the list of platforms used for running tests, select → (Ctrl+P). The following dialog will be displayed:
Figure 15.2. Platforms dialog box
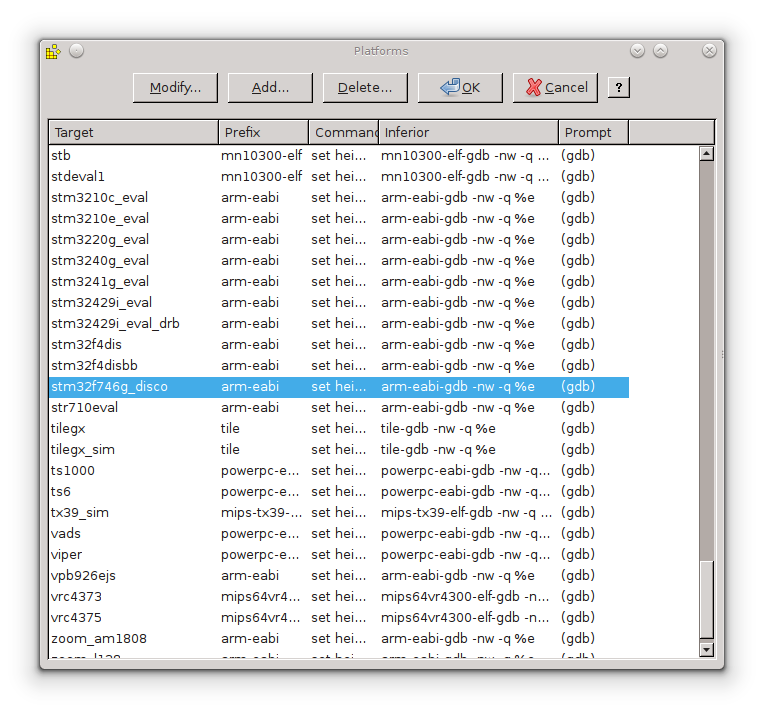
You may add, modify or remove platform entries as you wish, but in order to run tests, a platform must be defined to correspond to the currently loaded hardware template. The information associated with each platform name is used to run tests.
To modify a platform, click the Modify button with the appropriate platform selected, or double-click on an entry in the list. A dialog will be displayed that allows you to change the command prefix, platform type and arguments for GDB.
Figure 15.3. Platform Modify dialog box
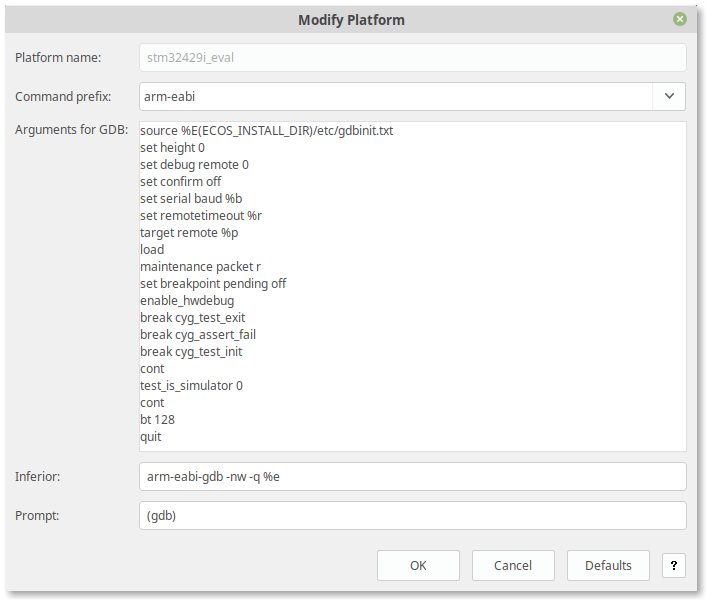
To add a new platform, click the Add button. A similar dialog will be displayed that allows you to define a new platform. To remove a platform, click the Delete button or press the DEL key with the appropriate platform selected.
Platform dialog fields
- Command prefix
Used when running tests in order to determine the names of the executables (such as gdb) to be used. For example, if the gdb executable name is “arm-eabi-gdb.exe” the prefix should be set to “arm-eabi”.
- Arguments for GDB
Specifies the set of commands, in sequence, are normally required to run an eCos test from start to finish. This includes how to make provision for retrieving diagnostic messages from the target.
Lines that provide Platform Variables (see below) that have not been set within platform properties (see Figure 8.2, “Properties dialog box”) will be omitted from the arguments passed to GDB.
- Inferior
Specifies the full GDB command with arguments to be launched in order to commence each test. If the executable is not on the
PATH, the full path to the executable must be used.- Prompt
Specifies the prompt to expect before executing the next gdb command provided in the list above.
Variables: To facilitate easy modification of test executables, timeouts, baud rates, target location, etc. the Arguments for GDB and Inferior may reference variables which are replaced at execution time. The following variables may be used:
Platform variables
- %b
Serial baud rate (Serial Baud value set in Figure 8.2, “Properties dialog box”)
- %e
Full path name to the test executable
- %p
Port, such as the serial port, path to the device, TCPIP address and port, pipe and pipe command (Serial Port, TCP/IP Address or Pipe Command values set in Figure 8.2, “Properties dialog box”)
- %r
Remote timeout (Remote value set under Timeouts in Figure 8.2, “Properties dialog box”)
- %E(
VARIABLE) The value of the environment variable
VARIABLE.See Section 11.2, “Environment Variables” for further information on environment variables.
15.4. Using Templates
To switch a configuration to a new template, select → (Ctrl+M).
The following dialog box will be displayed:
Figure 15.4. Templates dialog box

The target hardware dialog will be disabled as switching hardware within a configuration can have unintended consequences within eCos. See Section 15.2, “Switching Targets, Repositories and Versions” for details on how to switch a configuration to a new target.
To choose a packages template, choose from the template drop-down. Brief descriptions of each kind of template are provided in the corresponding edit boxes.
15.4.1. Resolving conflicts
During the process of configuring eCos it is possible that conflicts will be created. For more details of the meaning of conflicts, see Chapter 22, CDL Concepts.
The Conflicts Window displays all conflicts in the current configuration. Additionally, a window in the status bar displays a count of the conflicts. Because the resolution of conflicts can be time-consuming, a mechanism exists whereby conflicts can be resolved automatically.
You can choose to have a conflicts resolution dialog box displayed by means of the → (Ctrl+T) menu item, on the Conflict Resolution tab of the dialog.
Figure 15.5. Options
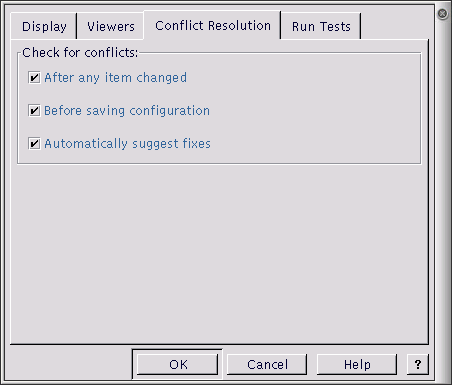
You can choose to have conflicts checked under the following circumstances:
After any item is changed (in other words, as soon as the conflict is created)
Before saving the configuration (including building)
Never
The method you chose depends on how much you need your configuration to be free of conflicts. You may want to avoid having to clean up all the conflicts at once, or you may want to keep the configuration consistent at all times. If you have major changes to implement, which may resolve the conflicts, then you might want to wait until after you have completed these changes before you check for conflicts.
![[Note]](pix/note.png) | Note |
|---|---|
If you choose to check conflicts after any item is changed, only newly arising conflicts are displayed. If you choose to check for conflicts before saving the configuration, the complete set is displayed. |
15.4.2. Automatic resolution
If you check the “Automatically suggest fixes” check box, a conflicts resolution dialog box will be displayed whenever new conflicts are created. The same dialog box may be displayed at any stage by means of the → menu item.
The conflicts resolution dialog box contains two major windows.
Figure 15.6. Resolve conflicts window
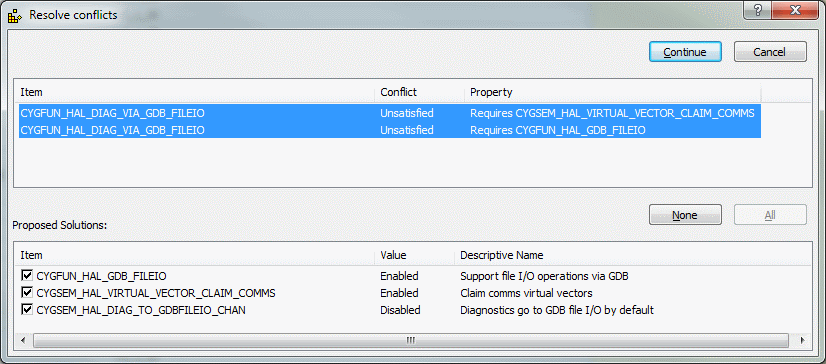
The upper contains the set of conflicts to be addressed; the format of the data being as that of the Conflicts Window. The lower window contains a set of proposed resolutions – each entry is a suggested configuration item value change that as a whole may be expected to lead to the currently selected conflict being resolved.
Note that there is no guarantee:
that automatic resolutions will be determinable for every conflict.
that the resolutions for separate conflicts will be independent. In other words, the resolution of one conflict may serve to prevent the resolution of another.
that the resolution conflicts will not create further conflicts.
The above warnings are, however, conservative. In practice (so long as the number and extent of conflicts are limited) automatic conflict resolution may be used to good effect to correct problems without undue amounts of programmer intervention.
In order to select the conflicts to be applied, select or clear the check boxes against the resolutions for each proposed resolution. By default all resolutions are selected; you can return to the default state (in other words, cause all check boxes for each conflict to again become checked) by pressing the “Reset” button. Note that multiple selection may be used in the resolutions control to allow ranges of check boxes to be toggled in one gesture.
When you are happy to apply the selected resolutions for each conflict displayed, click Apply; this will apply the resolutions. Alternatively you may cancel from the dialog box without any resolutions being applied.
15.5. Configuration Information
An important part of creating products using eCos is determining the licenses under which the sources forming the active packages of an eCos configuration are distibuted. To assist with this process, all top-level eCos packages have one or more license attributes associated with the package. Each attribute name indicates the licenses under which the source code of the package is distributed. Some example attributes and their associated licenses are:
Table 15.1. License Attributes
| Attribute | License |
|---|---|
| license_ecospro | eCosPro License |
| license_ecospro_eval | eCosPro Evaluation License |
| license_ecosgpl | eCos Public License |
| license_gplv2 | GNU GENERAL PUBLIC LICENSE v2 |
| license_gplv3 | GNU GENERAL PUBLIC LICENSE v3 |
| license_bsd3clause | Modified BSD "2 clause" or "3 clause" Licenses |
| license_bsd4clause | Modified BSD "4 clause" Licenses |
| license_zlib | ZLIB License |
| license_eclipse | Eclipse Public License - v1.0 |
| license_opl | Open Publication License |
| license_yaffsgpl | YAFFS GPL Dual license |
If a top-level package is select within the configuration tree, the properties window will include an Attributes property field that contains the attributes associated with the package.
Figure 15.7. Repository and Configuration Information dialog box
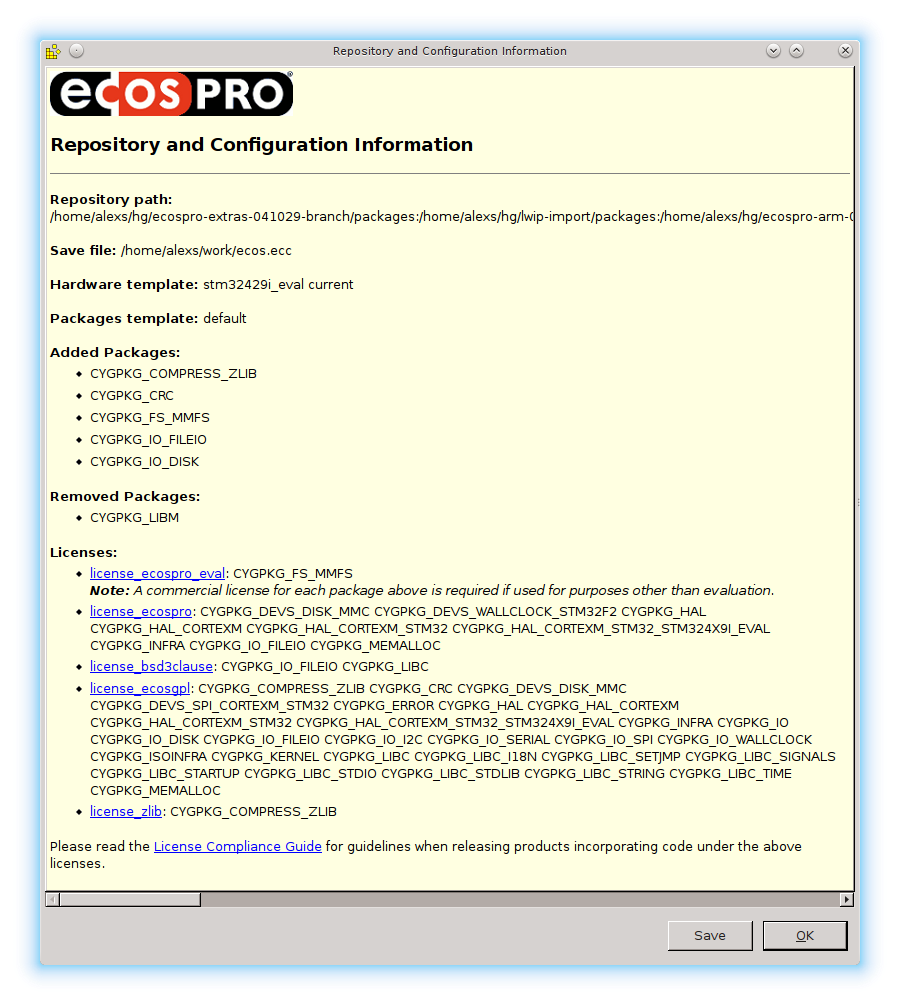
In addition to the Attributes property field, the
configuration tool includes a Repository and Configuration
dialog, as illustrated above. This dialog displays summary
information of the user's configuration and may be opened by selecting
the
→ (Ctrl+I) menu option. An HTML copy of the summary
information may also be saved to a local file for reference
purposes through the Save option of the
dialog box.
As illustrated, the repository, hardware template and packages template used in generating the initial configuration are displayed, as well as any packages subsequently added or removed from the initial configuration. Lastly, the license attributes allocated to each top-level package used in the configuration are presented, with the macro names of packages with that attribute appearing beneath each license attribute. If a license attribute is selected, the configuration tool will open a browser window to the corresponding license on eCosCentric's web site. If an evaluation package has been included, the developer is alerted in the summary that binaries generated by this eCos configuration will require a commercial license for the eCosPro packages listed. Note that because packages may have multiple license attributes and so the macro names may appear more than once in the licensing breakdown.
![[Note]](pix/note.png) | Note |
|---|---|
The Attributes property as well as the additional repository, configuration and licensing information are only available in verions of eCosPro 4.0 and above. |
| 2025-10-02 | Open Publication License |


