Chapter 14. Screen Layout
The following windows are available within the eCos Configuration Tool:
Configuration Window
Properties Window
Short Description
Conflicts
Output
The layout of the windows may be adjusted to suit your preferences: see Section 13.2, “Settings”.
14.1. Configuration Window
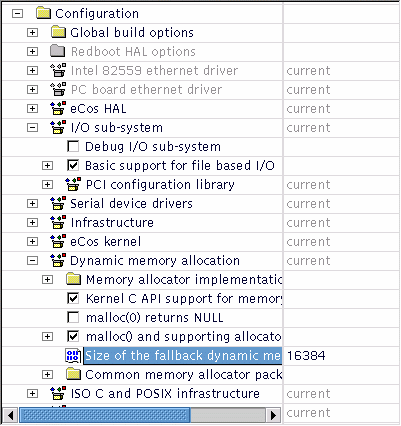
This is the principal window used to configure eCos. It takes the form of a tree-based representation of the configuration items within the currently loaded eCos packages.
In the case of items whose values may be changed, controls are available to set the item values. These either take the form of check boxes or radio buttons within the tree itself or cells to the right of the thin vertical splitter bar. Controls in the tree may be used in the usual way; cells, however, must first be activated.
To activate a cell, simply click on it: it will assume a sunken appearance and data can then be edited in the cell. To terminate in-cell editing, click elsewhere in the configuration window or press ENTER. To discard the partial results of in-cell editing and revert to the previous value, press ESC.
Figure 14.1. Configuration Window

Cells come in three varieties, according to the type of data they accept:
Table 14.1. Cell types
| Cell Type |
Data Accepted |
|---|---|
| Integer | Decimal or hexadecimal values |
| Floating Point | Floating point values |
| String | Any |
In the case of string cells, you can double-click the cell to display a dialog box containing a larger region in which to edit the string value. This is useful in the case of long strings, or those spanning multiple lines.
14.1.1. Disabled items
Some items will appear disabled. In this case the item label and any associated controls and cells will be grayed. It is not be possible to change the values ofdisabled items.
14.1.1.1. Right-Clicking
You can right-click on an item in the configuration window item to display a pop-up menu which (depending on the type of the item selected) allows you to:
Properties – information relating to the currently selected item is displayed. The information is equivalent to that displayed in the Properties Window.
Restore Defaults - the default value of the currently selected item is restored.
Visit Documentation - causes the HTML page most closely relating to the currently selected item to be displayed. This has the same effect as double-clicking the URL property in the Properties Window.
View Header File – this causes the file containing the items to be displayed. This is equivalent to double-clicking on the File property in the Properties Window. The viewer used for this purpose may be changed using the → (Ctrl+T) menu item (see Section 13.2, “Settings”). Note that this operation is only possible when the current configuration is saved, in order to avoid the possibility of changing the source repository.
Unload Package - this is equivalent to using the → (Ctrl+P) menu item to select and unload the package in question.
14.1.2. Conflicts Window
This window exists to display any configuration item conflicts. Conflicts are the result of failures to meet the requirements between configuration items expressed in the CDL. See Section 22.6, “Conflicts”
Figure 14.2. Conflicts Window

The window comprises three columns:
Item
This is the macro name of the first item involved in the conflict.
Conflict
This is a description of the conflict type. The currently supported types are “unresolved”, “illegal value”, “evaluation exception”, “goal unsatisfied” and “bad data”.
Property
This contains a description of the configuration item‚s property that caused the conflict.
Within the conflicts window you can right-click on any item to display a context menu which allows you to choose from one of the following options:
To locate the item involved in the conflict, double-click in the first or third column, or right-click over the item and choose Locate from the popup menu.
You can use the → . menu item, or right-click over the item and select Resolve from the popup menu, to resolve conflicts — Section 15.4.1, “Resolving conflicts”.
14.1.2.1. Output Window
This window displays any output generated by execution of external tools and any error messages that are not suitable for display in other forms (for example, as message boxes).
Within the output window you can right-click to display a context menu which allows you to:
Save the contents of the window to a file
Clear the contents of the window
14.1.2.2. Properties Window
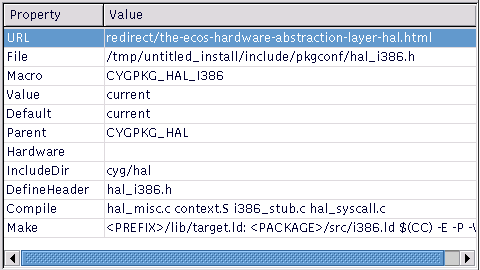
This window displays the CDL properties of the item currently selected in the configuration window. The same information may be displayed by right-clicking the item and selecting “properties”.
If a property is displayed with a light-pink background, this inicates that the property is in conflict with another setting in the current configuration.
Figure 14.3. Properties Window

The following properties may be double-clicked as follows:
URL – double-clicking on a URL property causes the referenced HTML page to be displayed. This has the same effect as right-clicking on the item and choosing “Visit Documentation”.
File – double-clicking on a File property in a saved configuration causes the File to be displayed. The viewer used for this purpose may be changed using the → (Ctrl+T) menu item. Note that this operation is only possible when the current configuration is saved, in order to avoid the possibility of changing the source repository.
Requires – double-clicking on this property will Locate the first property displayed in the value field.
If a property value is selected with a mouse click, you are given the option of copying the property value to the desktop's cut-and-paste buffer. This allows you to either use the value when developing your own package or to paste it into the search dialog to determine additional information regarding that package.
14.1.2.3. Short Description Window
This window displays a short description of the item currently selected in the configuration window. More extensive documentation may be available by right-clicking on the item and choosing “Visit Documentation”.
| 2025-10-02 | Open Publication License |


