| Chapter 3. Quick Start / Walkthrough | ||
|---|---|---|
 |  | |
| Chapter 3. Quick Start / Walkthrough | ||
|---|---|---|
| | | |
This chapter shows how to create a simple eCos “Hello World” application project from scratch, using the included project template and a default eCos configuration on the target hardware.
Startup Eclipse.
If this is your first time running Eclipse, you will be asked to select a workspace. This is where your projects, folders and files will be kept. Enter a suitable location, or leave the default location selected. You will then be presented with the Welcome screen which you can also return to at any time from the menu option: →
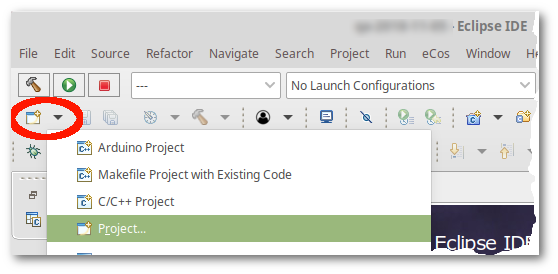
Open the “C Project” dialog window:
Method 1:
Select the New Project wizard for your project from the menu → → (Figure 3.1, “New Project from Menu”) or toolbar (Figure 3.2, “New Project from Toolbar”).
Figure 3.1. New Project from Menu
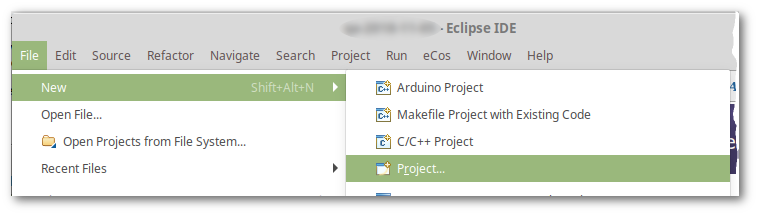
Figure 3.2. New Project from Toolbar
![[Note]](pix/note.png) | Note |
|---|---|
If you have run Eclipse before, and have the C/C++ Perspective
active, your
→
sub-menu may include both the |
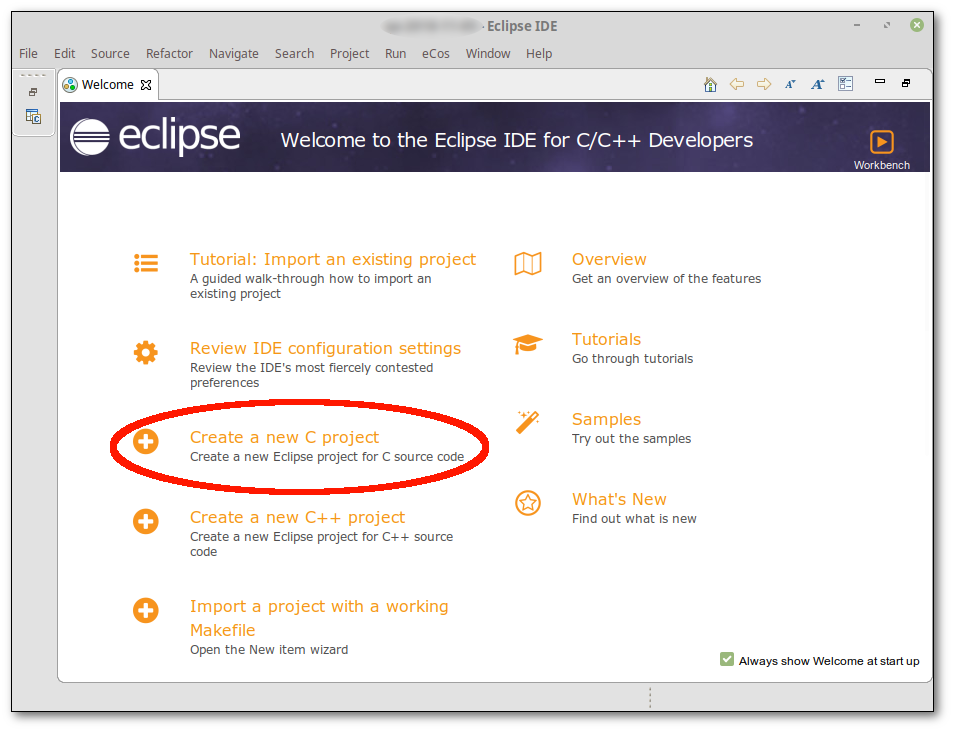
Method 2:
From the Welcome Screen, select either
Create a new C project or
Create a New C++ project, as highlighted below.
Figure 3.3. Welcome Screen
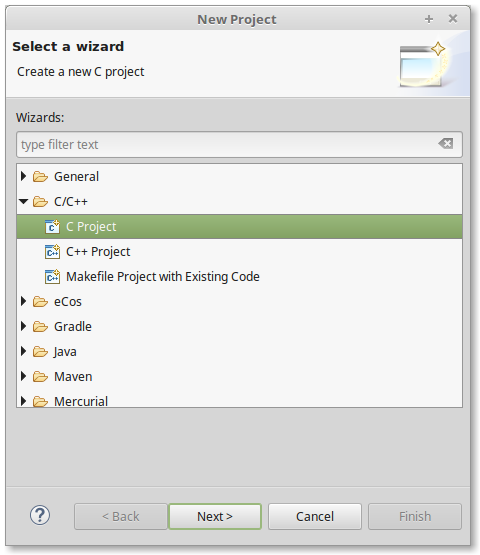
At the “New Project” dialog window, select: → and select the button as illustrated in Figure 3.4, “New Project”
Figure 3.4. New Project
![[Tip]](pix/tip.png) | Tip |
|---|---|
A C++ project may contain C code, but not vice versa. |
A “C Project” dialog window will appear prompting you to “Create C project of selected type”. In this example we will create an eCos Managed Make Application Project of subtype Hello World Managed C Project.
Select → as illustrated in Figure 3.5, “C Project”.
Figure 3.5. C Project
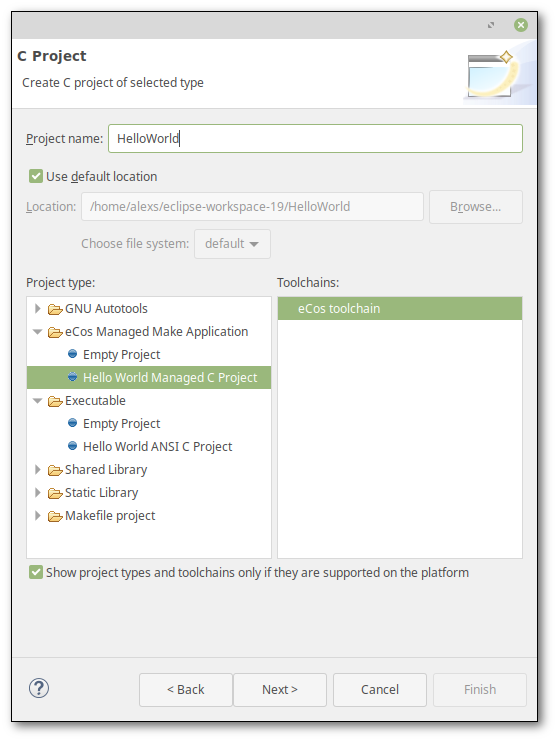
Normally the Empty Project subtype is used
as the starting point for new projects, but the Hello World
Managed C Project subtype is provided in order to create a
project for demonstration purposes which already contains an example
application. This application is a simple C program which, when run
on the target, will output “Hello World” on the console.
In every other respect it is the same as a normal eCos Managed Make
Application Project, and only exists to easily demonstrate Eclipse/CDT.
Enter a name for your project next to the Project name
option. HelloWorld was chosen in this example.
If desired, customise its location.
| Note |
|---|---|
Spaces are not permitted in the name of a project or workspace nor are they allowed in the path to the workspace. This is because Eclipse uses the GNU make utility for which spaces have a specific meaning. |
Check that the eCos toolchain is selected as illustrated
in Figure 3.5, “C Project” and select the
button.
The “eCos toolchain” entries are smart
wrappers which automatically detect the correct GNU toolchain (gcc, gdb,
…) to invoke based on the eCos configuration. If you later
change the project to use a different eCos build, the appropriate
toolchain will be invoked based on the settings within the associated
eCos configuration.
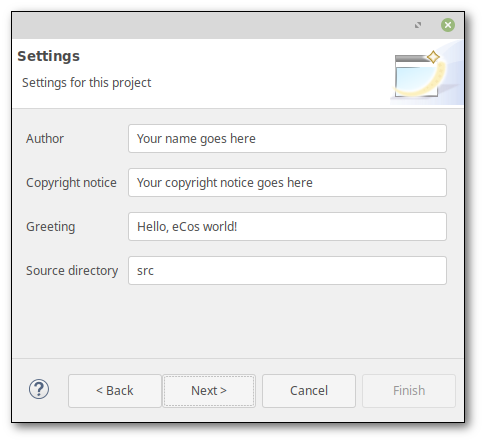
The Settings page shown in Figure 3.6, “Hello World Settings” appears to provide a number of fields to customise the Hello World project. Fill these in appropriately, and press .
| Note |
|---|---|
This page does not appear if you selected an |
Figure 3.6. Hello World Settings
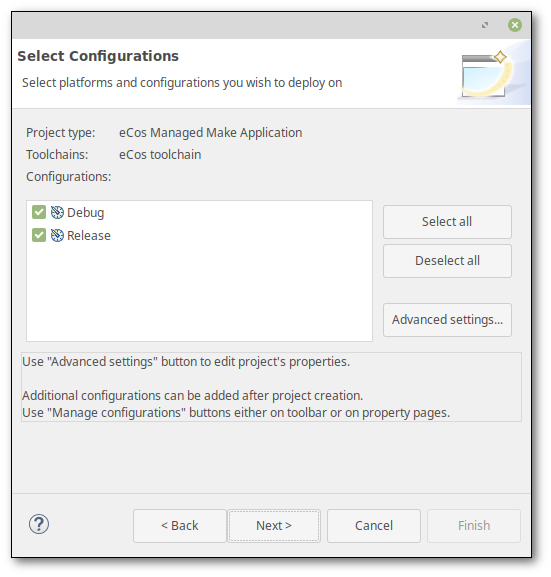
The Select Configurations page appears as illustrated in Figure 3.7, “Select Configurations”. It is not normally necessary to change anything here, so press again.
Figure 3.7. Select Configurations
The eCos Application Project configuration page appears as illustrated in Figure 3.8, “eCos Application Project configuration”. We are going to create a new eCos configuration, so select that option.
Figure 3.8. eCos Application Project configuration
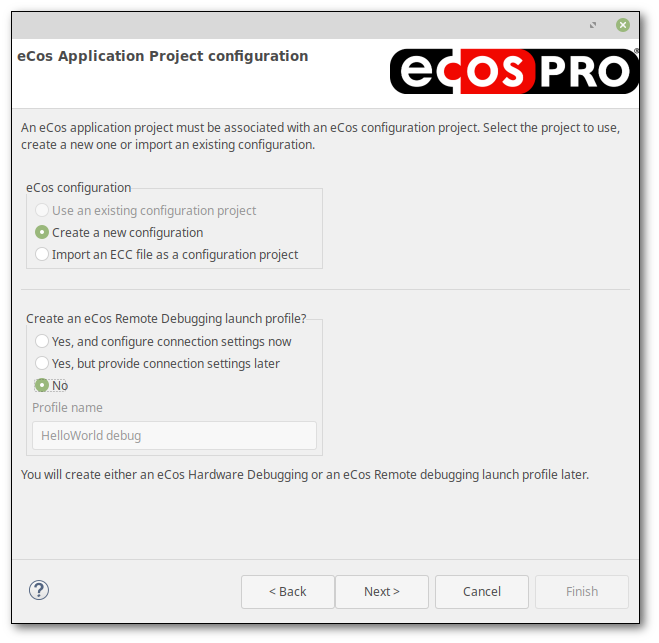
If you already have an eCos configuration for your target hardware in the form of an ECC file, you can instead import it as a configuration project. If you have already created or imported a configuration project, then the option to use an existing configuration project will no longer be greyed out, thereby allowing you to select the configuration project.
In order to create the ability to conveniently run this example on
our target hardware we need to create a launch configuration. Launch
configurations are used in Eclipse to describe how to run or debug
the application, and for eCos applications, the most important
aspect is that it provides information on how to connect to the
target hardware (serial parameters, TCP, JTAG, …). In
some instances, launch configurations are dependent on the eCos
configuration so for now in the Create an eCos Remote
Debugging launch profile? section select
No. You will create a
launch configuration later in
this example. No is required if you are using
eCos Hardware Debugging.
If you are familiar with your hardware and you know that you connect
to your hardware through either a serial port or a TCP/IP port and
know your target's IP address or DNS name, you may select
Yes, and configure connection settings now. You
must then provide the settings for Eclipse to communicate to your
hardware. If you do not know the connection settings now, select
Yes, but provide configure connection settings
        later
. By choosing to provide connection settings later,
we will be prompted for the settings when we first use the launch
configuration to run or debug the application.
| Notes |
|---|---|
|
| Tip |
|---|---|
|
Press . After a few seconds, the wizard starts presenting the pages required to create an eCos configuration project as illustrated in Figure 3.9, “New eCos Configuration project”.
Figure 3.9. New eCos Configuration project
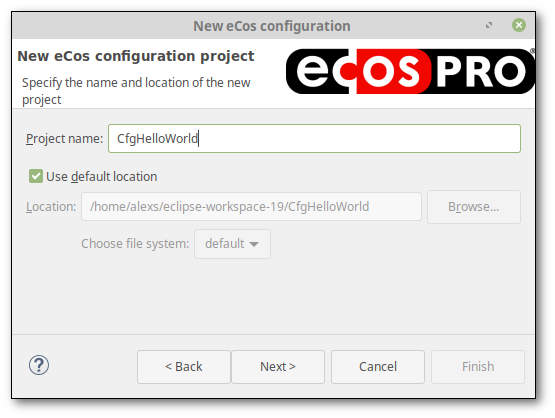
Specify a name for the configuration project. CfgHelloWorld
was chosen in this example. Again, you may set a non-default location if required.
Press .
If you have multiple eCosPro installations, the Profile Selection page appears as illustrated in Figure 3.10, “eCos profile selection”. The drop-down box contains the list of detected profiles associated with eCosPro releases installed on your system. You can find out more information about profiles in the eCos and eCosPro User Guide. Select the appropriate release for your hardware and press .
Figure 3.10. eCos profile selection
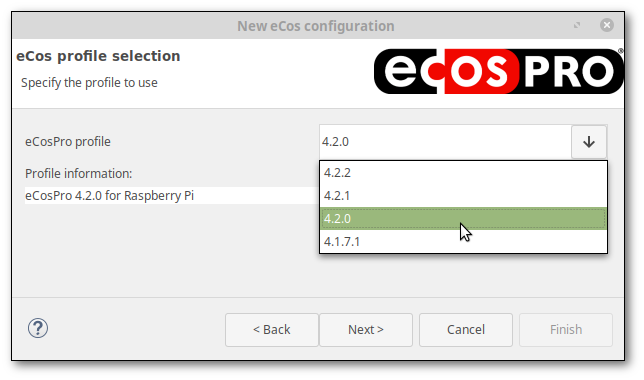
| Tip |
|---|---|
eCosPro releases prior to 3.1.0 will not appear in this
list. If you have an older release installed which set the
|
The Target and Template Selection page
appears as illustrated in Figure 3.11, “eCos target and template selection”.
The default hardware target and template for the selected
profile are preselected as defaults. In this example, we are using
the stm3220g_eval, but you should select the
relevant target for your hardware.
Figure 3.11. eCos target and template selection
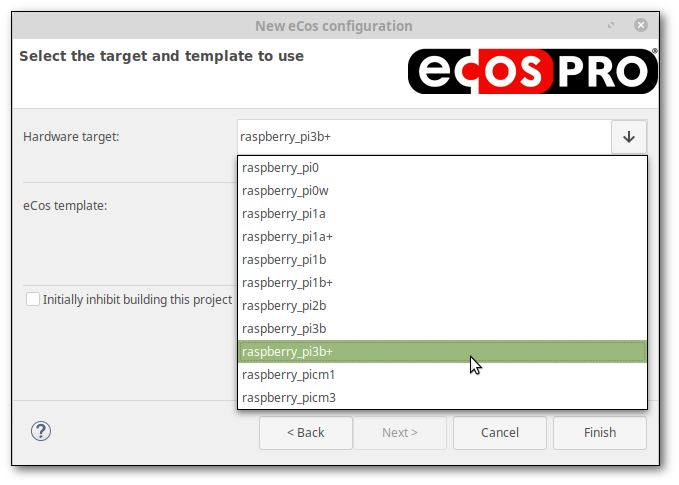
Note the option entitled Initially inhibit building this project in Figure 3.11, “eCos target and template selection”. When checked, this option prevents the configuration from being built. This is useful if you want to make further changes to your new eCos configuration before building it. For the purposes of this example, keep the option unchecked.
Finally, press . The two projects are created in your Eclipse workspace, with a project reference created within the application project to the eCos configuration project.
At this point, if you are running Eclipse for the first time, you will be prompted whether you wish to switch to the C/C++ perspective and whether you wish to switch automatically to this perspective in the future as illustrated in Figure 3.12, “Open Associated Perspective”.
Figure 3.12. Open Associated Perspective
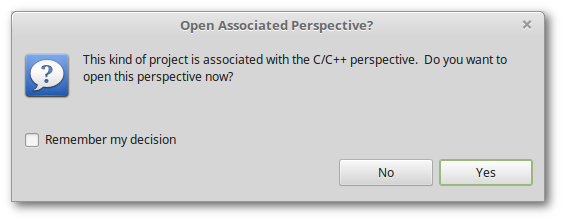
For further information on perspectives, see → → .
Optionally check Remember my decision and
select .
| Note |
|---|---|
If you do not see this dialog because you have already run Eclipse and remembered this decision, you will not be prompted. Switch to the C/C++ perspective manually now if you have not already switched to that perspective. |
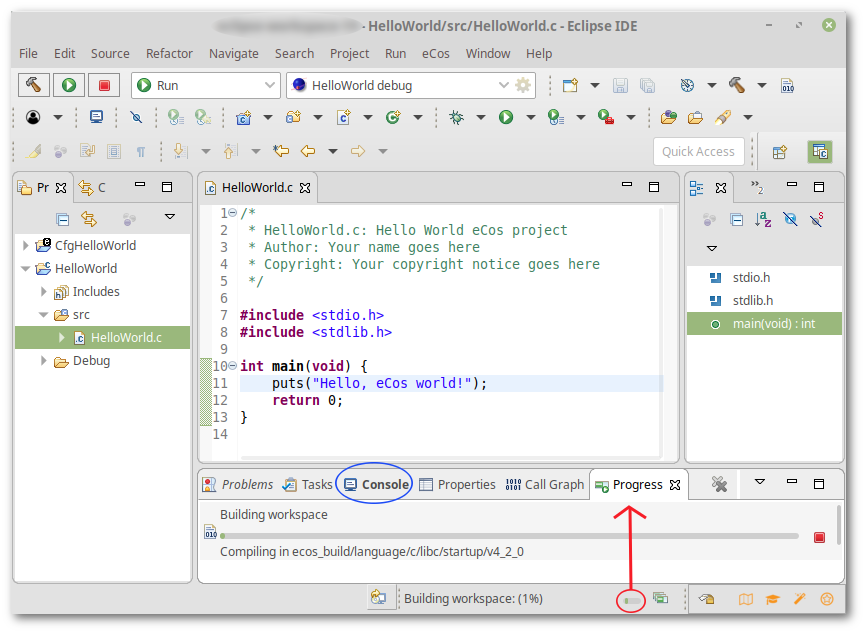
At this point you should now be in the C/C++ perspective illustrated in Figure 3.13, “Build Progress”. You may return to this perspective at any time by selecting the perspective button called out by the speach bubble within that figure.
As we left the inhibit option unchecked,
Eclipse automatically begins to build the eCos configuration in the
background. Progress reporting appears in the bottom-right corner of
the workbench window. You can on the
progress bar circled in red in the figure to open up the indicated
Progress view which has more detailed
information, or even watch the build output on the
Console view by selecting the
Tab circled in blue.
Figure 3.13. Build Progress
| Note |
|---|---|
You may notice some initial errors appearing in the Console and Problems views, if you have them open. These notifications are benign and will clear when the configuration project has been built. |
To manually build the application project select → (Ctrl+B), as illustrated in Figure 3.14, “Build Project Menu”.
Figure 3.14. Build Project Menu

Alternatively on the application project within the Project Explorer window and select as illustrated in Figure 3.15, “Application Build Project Menu”:
Figure 3.15. Application Build Project Menu
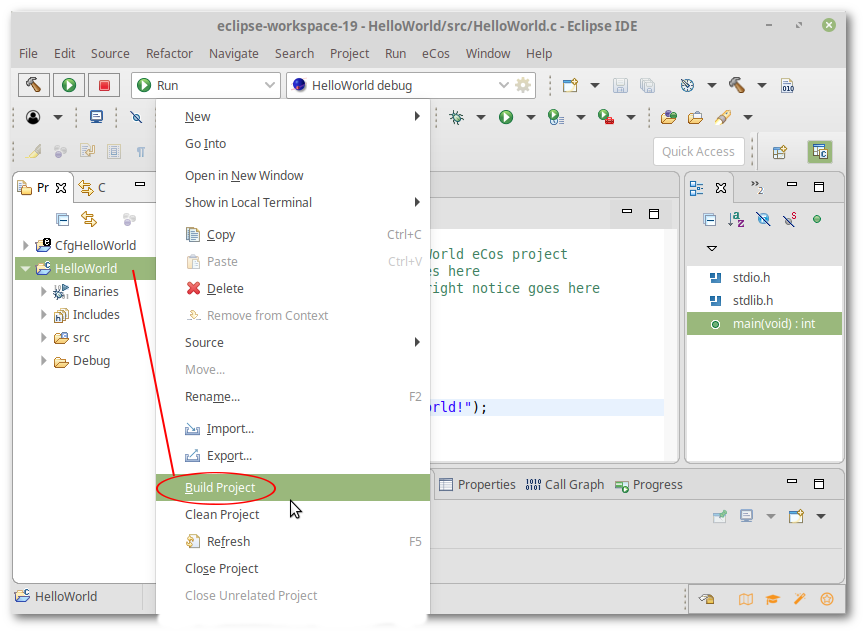
Once started, the build progress may be tracked as illustrated in Figure 3.13, “Build Progress”. Wait a while for the build to complete; if the configuration build was still running, Eclipse schedules the application project build to happen next.
The Eclipse CDT project builder is fully integrated with the Eclipse background builder so that both the application project as well as the associated eCos configuration project will be built in the background by default. This option may be de-selected through the following steps: → and in the resultant popup: → → deselect the Build target in the background option.
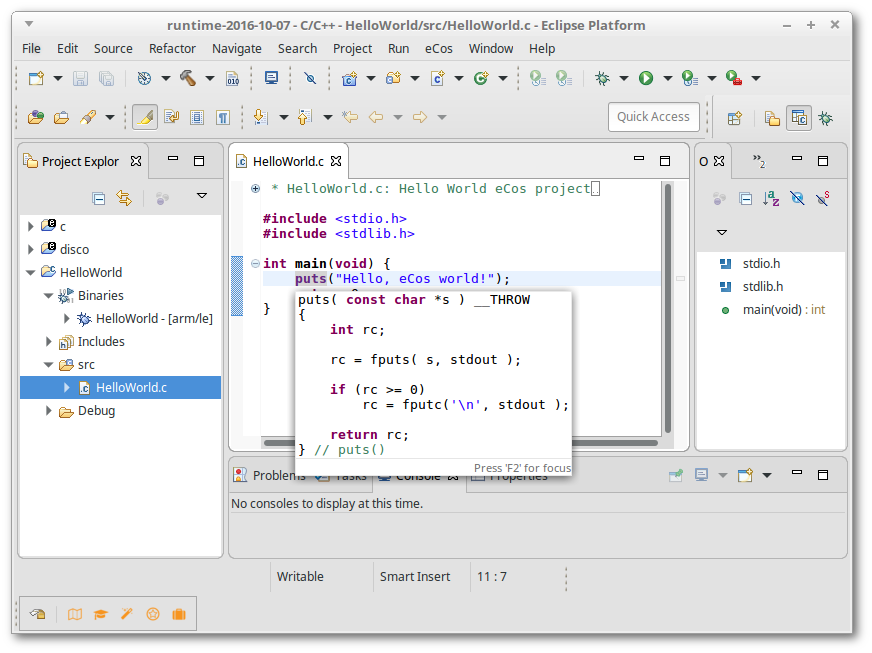
Your application project has now built. Browsing it in the
Project Explorer view you will notice the source directory, Debug
(containing builds in the Eclipse "Debug" build mode, which is the
default) and autogenerated lists of Binaries and Includes. You can
also browse the configuration project's build and install
directories, the configuration file ecos.ecc
and (via an Eclipse filesystem link) the source repository. All the
usual Eclipse CDT functionality, such as the Content
Assist feature which provides a list of available
functions (
→ (Ctrl+Space)), function
prototyping and descriptions as illustrated in
Figure 3.16, “Project Explorer and Context Editor”.
Figure 3.16. Project Explorer and Context Editor
The next chapter “Debugging eCos applications” provides a walkthrough showing how to download and debug the application you have just built.
| | | |
| Chapter 2. eCosPro CDT plug-in Macros |  | Chapter 4. Debugging eCos applications |
| 2021-05-20 | Legal Notice |