| Hardware Setup | ||
|---|---|---|
 | Chapter 367. TILE-Gx Architectural Support |  |
Name
Setup — preparing the hardware for eCos development
Overview
Just as the TILE-Gx hardware is rather different from more conventional hardware used to run eCos, the process of setting up the hardware is also rather different. Most importantly eCos only runs on some of the tiles in a chip, with Linux and the hypervisor running on the other tiles. It is the hypervisor that is responsible for booting all the tiles. Setting up the hardware involves constructing and running a suitable hypervisor image. Such an image contains the following:
-
The hypervisor executable,
hv. This is a 64-bit ELF executable. A default build is provided with the Tilera Multicore Development Environment (MDE) in the$TILERA_ROOT/tile/bootsubdirectory, but a custom build may be necessary to cope with specific hardware such as ethernet PHY chips. -
A hypervisor configuration file, typically with
.hvcsuffix. An example can be found in the MDE file$TILERA_ROOT/tile/etc/hvc/vmlinux.hvc. Amongst other functionality this configuration file allows some of the tiles to be designated as BME or bare metal executable tiles, which will run a dedicated application directly on the hardware instead of layered on top of Linux and the hypervisor. eCos applications run in a BME tile. -
A Linux kernel, for
example
$TILERA_ROOT/tile/boot/vmlinux. This is another 64-bit ELF executable. Again a custom build of the Linux kernel may be needed on some hardware. Note that the defaultvmlinuxfile has not been stripped of debug information and has not been compressed, so it will be some tens of megabytes in size. -
An initial RAM file system, for example
$TILERA_ROOT/tile/boot/initramfs.cpio.gz. This contains executables, shared libraries, and other files needed by the Linux system at run-time. Applications are very likely to involve a custom version of this RAM file system containing additional files, for example the application executables. Usually ELF files will be stripped off their debug information as they are incorporated into the initramfs file, and of course the latter is compressed. - If the hypervisor configuration file specifies that one or more tiles should form a BME partition, the executable that should run on those tiles must also be incorporated into the hypervisor image since it is the hypervisor that will launch that executable.
A hypervisor image is created directly by the tile-mkboot command, or indirectly by tile-monitor. An initramfs file is created by tile-gen-initramfs. Full information on these commands is provided in the Tilera documentation, especially UG509 The Multicore Development Environment System Programmer's Guide. That information is not repeated here, instead this document focusses only on eCos-specific aspects. It is assumed throughout that the application developer has a working MDE installation and that the hardware is already set up for developing Linux applications.
The setup process is different for debug and production systems. A debug system allows eCos applications to be loaded and debugged via tile-gdb, and will be used for most of the development process. In a production system the eCos application is loaded and starts running automatically during bootstrap, but cannot be debugged via tile-gdb (except under certain circumstances when running on the simulator instead of real hardware). There are also three different scenarios: running on real hardware with the hypervisor image loaded over USB; running on real hardware with the hypervisor image booting automatically from a serial ROM; and running on the simulator.
Debugging Overview
Debugging an application running on a TILE-Gx chip generally involves software rather than any hardware debug technology. First consider a process running in the Linux partition of a TILE-Gx chip:
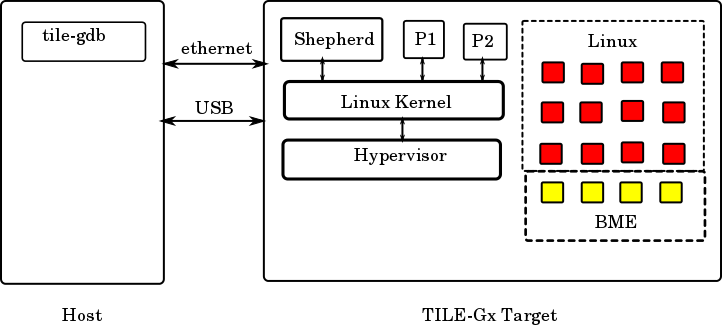
This shows a 4x4 TILE-Gx chip with 12 of the tiles configured as a
Linux partition and 4 tiles configured as a BME partition. There are
two application processes running in the Linux partition, P1 and P2,
both sitting on top of the Linux kernel which in turn sits on top of
the hypervisor. There is also an auxiliary process, the shepherd. A
host PC is connected to the TILE-Gx target via USB and ethernet.
Debugging an application on the TILE-Gx target involves
running tile-gdb on the host PC. This debugger
instance connects to the shepherd process on the target, and
communication between the two uses the gdb remote protocol over
TCP/IP. When for example tile-gdb needs to read a
memory location inside process P1 it constructs a memory read remote
protocol request and sends this to the shepherd on the target. The
shepherd decodes the request and then makes
a ptrace system call into the Linux kernel. The
kernel performs the desired operation and passes the result back to
the shepherd. This constructs a remote protocol reply message which
gets sent back to tile-gdb on the host, and the
debugger now has the required information.
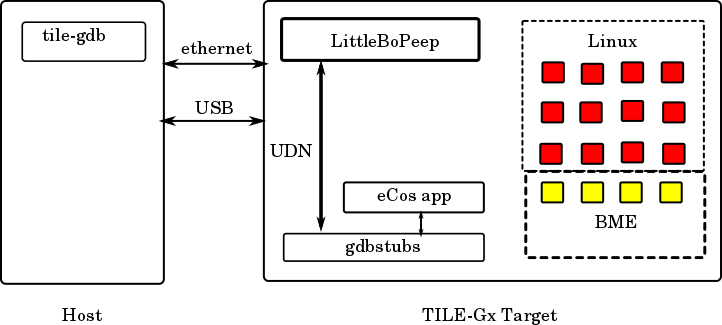
Debugging an eCos application running inside a BME tile involves a
similar but not identical process. The key difference is that a Linux
kernel running in the TILE-Gx chip has no control over any of the BME
tiles, so the ptrace system call is useless.
Instead the main debug functionality is provided by a special eCos
application, gdbstubs, held in the
file gdb_module.64. The hypervisor boots this
eCos application into each BME tile. The user's eCos application is
loaded and run on top of gdbstubs. Now, unfortunately gdbstubs does
not have the same ready access to the outside world as the Linux
shepherd: the target's network and USB interfaces are managed by the
Linux side so gdbstubs cannot easily provide TCP/IP communication.
Instead there is another process, LittleBoPeep running inside the
Linux partitition alongside the shepherd. LittleBoPeep accepts TCP/IP
connections from tile-gdb instances on the host.
Remote protocol requests are passed on to gdbstubs running on the
appropriate BME tiles over the TILE-Gx internal UDN communication
network. gdbstubs decodes the request, performs the appropriate
operation such as reading a memory location, and sends the reply back
to LittleBoPeep over UDN. LittleBoPeep then forwards the reply
to tile-gdb on the host, and the debugger now has
the required information.
UDN messages are addressed to a specific tile, so for LittleBoPeep to receive messages from gdbstubs it must bind itself to a specific tile within the Linux partition. It will always select the last tile in that partition. This may cause problems if other Linux applications attempt to use UDN communications. By default a user-level process like LittleBoPeep does not have permission to access the UDN network, so it has to make a call into the Linux kernel to obtain access. The Linux kernel will only allow one process per tile to perform UDN communication, which is a somewhat strange restriction since the UDN hardware supports four separate communication channels and LittleBoPeep only needs one of them. Therefore if some other process runs on the same tile as LittleBoPeep and claims UDN access first, LittleBoPeep's UDN initialization will fail. Alternatively if LittleBoPeep initializes first then the other process' attempt at claiming UDN access will fail. This problem cannot be worked around without changing the Linux kernel.
Hardware, USB Bootstrap, Debug system
The first scenario involves a debug system running on real hardware
with the hypervisor image booted via USB
and tile-monitor. This is likely to be the most
common scenario during software development. The first step is to
take an existing .hvc hypervisor configuration
file, for
example $TILERA_ROOT/tile/etc/hvc/vmlinux.hvc, and
append lines like the following:
# Define the BME tiles
bme bmeapp private 3,0 3,1 3,2 3,3
  memory 0 default
  pertile va=0x6c000000
These lines define a BME partition consisting of four tiles: 3,0 3,1
3,2 and 3,3. The BME partition can be given more, fewer, or different
tiles by changing this list of tile addresses. The application that
will be run on each tile is given an alias
of bmeapp, and that alias will be mapped on to a
real filename via a tile-monitor command line
argument. The keyword private is essential: it
informs the hypervisor that each BME tile is independent from the
other and needs its own memory. The alternative would be a BME
partition running a single SMP application with the memory shared
between the BME tiles, and SMP is not supported with the current
TILE-Gx eCos port.
The line memory 0 default determines which memory
controller is used for the BME tiles' memory. This particular line is
cloned from the
MDE's tilegx/examples/bme/client_server/sim.hvc.
Application developers may wish to use different settings for this as
per the Tilera manual UG509, section 8.4.3.
The bulk of the memory allocated to a BME application is determined
automatically by the hypervisor from information in the ELF
executable. However the hypervisor will allocate an additional block
of pertile memory to hold the initial stack, some hypervisor data
structures, and so on. The line pertile
va=0x6c000000 places that additional block within the 32-bit
address space supported by an eCos application. This line must not be
changed since eCos expects to find the memory at that address.
Note that the Tilera tools support only a single BME partition definition in the hypervisor configuration file. Therefore it is not possible to run different applications on different BME tiles, or to have different memory settings for different tiles. Usually this will not be an issue for a debug system because the executable is always a gdbstubs binary.
Once the hypervisor configuration file is ready it is possible to boot up the system with tile-monitor:
tile-monitor --verbose --dev /usb0 --hvc ecos.hvc \
             --mkboot-args -+- --no-strip -+- \
             --bme bmeapp=<path0>/gdb_module.64 \
             --upload <path1>/LittleBoPeep /LittleBoPeep \
             --launch - /LittleBoPeep 3,0 3,1 3,2 3,3 -
The various options are as follows:
-
--verboseis optional. It enables additional diagnostics within tile-monitor which may help to track down problems. -
--dev /usb0tells tile-monitor how to interact with the target hardware, in this case through thetileusb0device provided by the Tilera USB device driver. If the hardware is accessed via some other means then argument will need to be adjusted accordingly. -
--hvc ecos.hvcidentifies the hypervisor configuration file that should be used. -
--mkboot-args -+- --no-strip -+-causes tile-monitor to pass the argument--no-stripwhen it invokes a sub-process tile-mkboot to create the hypervisor image. By default tile-mkboot will strip all debug information out of ELF executables that go into the hypervisor image, including the BME executable. Unfortunately tile-strip is not compatible with eCos executables and will corrupt them, preventing the hypervisor from correctly loading these executables into the BME tiles. Suppressing the automatic stripping bypasses this problem. -
--bme bmeapp=<eCos executable>. The BME lines in the hypervisor configuration file specified bmeapp as an alias for the executable that should be run on all BME tiles. Here we specify exactly which file corresponds to that alias. For a debug system the executable should always be a gdbstubs binarygdb_module.64. A prebuilt version of that executable should be included in the release, or alternatively a binary can be rebuilt as described below. -
--upload <path1>/LittleBoPeep /LittleBoPeep. This uploads the LittleBoPeep executable to the target, storing in in the root of the RAM file system. -
--launch - /LittleBoPeep 3,0 3,1 3,2 3,3 -Once LittleBoPeep has been uploaded to the Linux system it is started with the appropriate arguments. These arguments specify the BME tiles running gdbstubs and should match the list in the hypervisor configuration file.
The above invocation of tile-monitor uses the
default hypervisor executable, the default Linux kernel executable and
the default initramfs file
from $TILERA_ROOT/tile/boot.
Alternative versions of these can be specified if desired using
--hv-bin-dir, --vmlinux or
--initramfs options. See
the tile-monitor documentation for more
information.
Once the hypervisor image has been created, downloaded over USB, and started the hypervisor will set up the BME tiles and start the bmeapp application on each one. When gdbstubs is that application it will pause early on during initialization, waiting to be contacted by LittleBoPeep over the UDN network. Some time later, when uploading and launching LittleBoPeep tile-monitor should report the following:
[monitor] Uploading...
[monitor] Uploading complete.
[monitor] Process 551 created using '/LittleBoPeep'.
The exact process number may vary depending on what else is running. LittleBoPeep will now start running, connect to gdbstubs running on the specified tiles, and report the status of each one on the system console:
LittleBoPeep: starting.
LittleBoPeep: tile 3,0, gdbstubs active, listening on port 10300
LittleBoPeep: tile 3,1, gdbstubs active, listening on port 10301
LittleBoPeep: tile 3,2, gdbstubs active, listening on port 10302
LittleBoPeep: tile 3,3, gdbstubs active, listening on port 10303
At this point LittleBoPeep, running in the Linux partition, is ready to accept TCP connections from tile-gdb on any network interface to any of the specified ports. Assume that the target-side Linux system has been set up with TCP/IP networking enabled and that the gbe0 network interface has been assigned the network address 10.1.1.42. Also assume that the user has configured and built a RAM-startup eCos application, for example the Hello World example, as per the eCos User Guide. It is now possible to load and run the eCos executable on one of the BME tiles:
% tile-gdb --quiet hello
Reading symbols from .../hello...done.
(gdb) target remote 10.1.1.42:10300
Remote debugging using 10.1.1.42:10300
0x00016550 in ?? ()
(gdb) load
Loading section .text, size 0x15d80 lma 0x10010000
Loading section .data, size 0x180 lma 0x10025d80
Start address 0x10010000, load size 89856
Transfer rate: 37 KB/sec, 987 bytes/write.
(gdb) break exit
Breakpoint 1 at 0x10021d40: file .../src/exit.cxx, line 75.
(gdb) continue
Continuing.
Hello, eCos world!
[Switching to Thread 2]

Breakpoint 1, exit (status=0x0) at .../src/exit.cxx:75
75  {
(gdb) maintenance packet r
sending: "r"
received: ""
(gdb) quit
A debugging session is active.

    Inferior 1 [Remote target] will be killed.

Quit anyway? (y or n) y
Obviously the sizes, transfer rate, and so on will vary somewhat. The
command target remote 10.1.1.42:10300 tells
tile-gdb to establish a TCP/IP connection to IP address 10.1.1.42,
port 10300, and communicate using the gdb remote protocol. The IP
address corresponds to the target's gbe0 network interface - note that
any of the target's network interfaces may be used, gbe0 is used here
simply as an example. The port number is one of the ones reported by
LittleBoPeep and corresponds to tile 3,0. The eCos application is
loaded and runs to completion, hitting a breakpoint at
the exit() function. Note that the application's
console output goes over the debug channel and is reported by
tile-gdb. LittleBoPeep supports concurrent debug
sessions to every BME tile running gdbstubs, but only
one tile-gdb instance can interact with a given
tile at a time.
Normally when gdb exits the target-side application is left running. Most of the time this is not what is wanted when developing an eCos application. Instead the desired behaviour is that the tile gets restarted, ready for loading and running another build of the application being debugged. That is achieved by the maintenance packet r command. Quitting tile-gdb after that command has been issued will cause the tile to restart, and LittleBoPeep will report:
LittleBoPeep: tile 3,0 is resetting.
LittleBoPeep: tile 3,0, gdbstubs active, listening on port 10300
The port assignment used by LittleBoPeep is straightforward: given a gdbstubs instance running on tile x,y, LittleBoPeep will accept TCP connections on port (10000 + 100x + y). This numbering scheme should support chips with up to 10000 tiles, although of course trying to debug applications on even a small fraction of that number of tiles will prove problematical.
eCos applications run with limited memory protection, and have unrestricted access to system resources such as the special purpose registers used for controlling the MMU and interrupts. Therefore an eCos application can crash the tile it is running on, for example by accidentally overwriting some critical area of memory. At that point tile-gdb and LittleBoPeep will no longer be able to communicate with the gdbstubs executable running on the target tile, and LittleBoPeep will report this:
LittleBoPeep has lost one of her sheep.
  Tile 3,0 has stopped responding to UDN packets.
  This tile is now marked as crashed and cannot be used again until the hardware is reset.
Most commonly this condition will be detected when the application stops producing output and the user attempts to interrupt it with a ctrl-C. Unfortunately the gdb remote protocol provides no easy way for LittleBoPeep to reliably send a suitable diagnostic message to tile-gdb, so the debugger will simply report that the connection to the target has been closed.
It should be noted that eCos does run with the MMU enabled and that
the eCos application only has access to the memory allocated to its
tile by the hypervisor during bootstrap, plus any additional memory
explicitly mapped into the address space typically by calling
hal_tilegx_mmap(). That additional memory may
correspond to memory-mapped I/O devices. It may also be memory
allocated by a Linux application using the TMC library whose details
are then passed on to the eCos application. eCos does not have access
to other memory in the system so for example it cannot overwrite
kernel data structures on some other tile running Linux.
The above tile-gdb example assumes that the system is set up with Linux TCP/IP networking enabled, so that tile-gdb can connect to LittleboPeep. If this is not the case, for example because all network interfaces are needed for non-TCP/IP communications, then a slightly different approach is needed. tile-monitor and the target-side shepherd process provide tunnelling support: tile-monitor will accept connections on the host PC and forward any data to the shepherd over the USB connection; the shepherd process will establish a matching TCP/IP connection within the Linux partition and forward any data to its destination within the target. Tunnelling requires some additional arguments when invoking tile-monitor:
tile-monitor --verbose --dev /usb0 --hvc ecos.hvc \
             --mkboot-args -+- --no-strip -+- \
             --bme bmeapp=<path0>gdb_module.64 \
             --tunnel 10300 10300 --tunnel 10301 10301 \
             --tunnel 10302 10302 --tunnel 10303 10303 \
             --upload <path1>/LittleBoPeep /LittleBoPeep \
             --launch - /LittleBoPeep 3,0 3,1 3,2 3,3 -
tile-monitor on the host PC will accept connections
on port 10300, and the shepherd will establish a matching target-side
connection to port 10300. Each tunnel argument establishes one such
pairing. Inside the tile-gdb session it is necessary to
use a remote address of localhost:10300 instead of
10.1.1.42:10300, connecting
via tile-monitor instead of directly to the remote
port.
Hardware, ROM Bootstrap, Debug System
This scenario also allows eCos applications to be debugged via tile-gdb and LittleBoPeep. However the hypervisor image is not booted into the target hardware via tile-monitor and USB. Instead the hardware boots automatically from a serial ROM. Setting up a system like this requires two steps: constructing a suitable hypervisor boot image; and programming that image into the serial ROM.
Creating the boot image involves either
the tile-mkboot command or tile-monitor
--create-bootrom which implicitly invokes the former. The
latter approach is taken here. As before a boot image incorporates a
hypervisor executable, a hypervisor configuration file, a Linux
kernel, an initramfs file, the executable to run on any BME tiles, and
a small number of support files. The hypervisor executable and
configuration file can be the same as before,
and gdb_module.64 should again be used as the BME
executable. However the Linux kernel and the initramfs file need
special attention.
A typical serial ROM is comparatively small, usually 16MB. Worse, that
ROM normally holds a primary boot loader and two separate boot images,
the current image plus a backup image to allow recovery if and when
things go wrong. That means a new boot image file has to be a bit less
than 8MB. Given that an uncompressed unstripped Linux kernel is some
tens of megabytes, clearly it is necessary to strip and compress it
when generating the boot image. tile-mkboot will do
this by default to all executables, but this behaviour can be
suppressed with the --no-strip option.
Unfortunately tile-mkboot will also attempt to strip and compress any BME executables, and does not provide any finer-grained control over this behaviour. Applying tile-strip to an eCos executable will corrupt it, and the hypervisor's BME loader code does not support loading compressed executables. Therefore if tile-mkboot stripping and compression is enabled then the eCos application cannot be loaded into a BME tile, but if it is disabled then the resulting boot image file will be far too large for the serial ROM.
The solution is to pre-strip and pre-compress the Linux kernel file before constructing the boot image.
$ tile-strip -o vmlinux_stripped $TILERA_ROOT/tile/boot/vmlinux
$ bzip2 -9 vmlinux_stripped
That takes care of the Linux kernel. It is also necessary to customize
the initramfs file so that LittleBoPeep is started automatically
during the Linux bootstrap process. The process of constructing a
custom initramfs with tile-gen-initramfs is
documented in the Tilera manual UG509, section 3.4.2. It involves
editing a contents.txt file, adding the following
lines:
file /usr/bin/LittleBoPeep DIR/LittleBoPeep 755 0 0
file /etc/rc.local DIR/rc.local 644 0 0
This assumes that the LittleBoPeep executable has been placed in the
same directory as the edited contents.txt and
that a file rc.local has been created alongside
it. That file should contain:
/usr/bin/LittleBoPeep 3,0 3,1 3,2 3,3 &
(This assumes that the application being developed does not already
involve an rc.local file to start various
processes within the Linux partition. If that file already exists then
the LittleBoPeep line can just be appended.)
The Linux bootstrap will automatically
run /etc/rc.local if that exists, so LittleBoPeep
will be started in the background and will connect to gdbstubs on the
four tiles specified. Obviously if the hypervisor configuration file
lists a different set of tiles then rc.local
should be updated to match.
Once a suitable Linux kernel and initramfs file are ready the boot image can be created:
tile-monitor --no-dev --create-bootrom image.bootrom \
             --hvc ecos.hvc --mkboot-args -+- --no-strip -+- \
             --vmlinux vmlinux_stripped.bz2 \
             --initramfs ecos_initramfs.cpio.gz \
             --bme bmeapp=<path>/gdb_module.64
This should produce a suitable
file image.bootrom. That file can now be
transferred to a running TILE-Gx system and programmed into the serial
ROM using sbim -i image.bootrom. When the hardware
is rebooted the hypervisor will automatically set up the BME tiles as
per the ecos.hvc configuration file, load and
start gdb_module.64 on each BME tile, and start
the Linux kernel on the remaining tiles. The Linux kernel will go
through its boot process and end up
running /etc/rc.local, which in turn will start
LittleBoPeep running. LittleBoPeep will connect to gdbstubs on the
specified tiles, then it will accept debug connections
from tile-gdb over TCP/IP as before.
Hardware, USB Bootstrap, Production System
Once the eCos application has been debugged to the developer's satisfaction it is time to switch from a debug system to a production system. This no longer involves gdbstubs or LittleBoPeep. Instead the eCos application is incorporated directly into the hypervisor boot image and started automatically. Note that this will happen fairly early on in the bootstrap process, before the Linux kernel is started let alone any Linux processes running on top of the kernel. Console output from the eCos application will go the target's system console.
The first step is to change the eCos configuration
option CYG_HAL_STARTUP from RAM to ROM. For the
TILE-Gx architecture RAM startup is for applications which will run on
top of gdbstubs, while ROM startup is for applications which are
incorporated into the hypervisor boot image. The eCos configuration
should then be rebuilt and the application relinked. Assume this
application is called ecosapp.
Now, an eCos application is a 32-bit executable. The hypervisor BME loading code only supports 64-bit executables. To work around this the TILE-Gx architectural HAL comes with a utility script tile-ecos-32to64 which reads in a full 32-bit executable, discards anything which will not be needed on the target-side such as debug information, and outputs a 64-bit pseudo-executable.
tile-ecos-32to64 ecosapp ecosapp.64
The output file ecosapp.64 will not be a
fully-fledged ELF executable and other tools such
as tile-objdump may be confused by it. It is
intended only for use by the hypervisor's BME loader. If say a
disassembly is required then tile-objdump should be
applied to the original 32-bit file, not the generated 64-bit
pseudo-executable. The system can now be started
via tile-monitor:
tile-monitor --verbose --dev /usb0 --hvc ecos.hvc \
             --mkboot-args -+- --no-strip -+- \
             --bme bmeapp=ecosapp.64
Most of these arguments are the same as when booting a debug system
over USB. The same hypervisor executable, hypervisor configuration
file, Linux kernel and initramfs file can be used. A different file is
associated with the bmeapp alias, and there is no
need to upload and launch LittleBoPeep since there are no gdbstubs
instances running in any of the BME tiles for it to talk to.
The Tilera hypervisor only supports a single application which will be run on all BME tiles. If the system needs different functionality on different tiles then the eCos application must be a union of all functionality, and a run-time decision must be made as to which tile runs what code.
Hardware, ROM Bootstrap, Production System
Setting up a production system which can boot from ROM is very similar
to setting up a debug system. It will again be necessary to strip and
compress the Linux kernel before generating the boot image. As far as
eCos is concerned there is no need for anything extra in the initramfs
file. In particular the LittleBoPeep executable would serve no purpose
so does not need to be included or started
from rc.local.
As far as the eCos executable is concerned, this must be processed in the same way as when booting a production system over USB. The eCos configuration must be changed to ROM startup and rebuilt, the application must be relinked, and the resulting 32-bit executable must be processed with tile-ecos-32to64. Once this is done the boot image can be created using tile-monitor:
tile-monitor --no-dev --create-bootrom image.bootrom \
             --hvc ecos.hvc --mkboot-args -+- --no-strip -+- \
             --vmlinux vmlinux_stripped.bz2 \
             --bme bmeapp=ecosapp.64
The resulting image.bootrom file can now be
transferred to a running TILE-Gx system and programmed into the serial
ROM using sbim -i image.bootrom.
Simulator, Debug System
Running an application in the simulator is mostly similar to running
on the hardware, albeit very much slower. Also the simulator does not
implement all the hardware functionality, for example ethernet
emulation is very limited. Typically a slightly different hypervisor
configuration file is used,
see $TILERA_ROOT/tile/etc/hvc/vmlinux-sim.hvc as
opposed to $TILERA_ROOT/tile/etc/hvc/vmlinux.hvc.
The file will need to be edited to incorporate a BME partition.
The simulator is usually started by another tile-monitor invocation:
tile-monitor --verbose --simulator --config gx8016 \
             --console --functional --gdb-port 9000 \
             --bm-debug-on-panic --debug-on-crash \
             --hvc ecos-sim.hvc \
             --mkboot-args -+- --no-strip -+- \
             --bme bmeapp=<path0>/gdb_module.64 \
             --tunnel 10300 10300 --tunnel 10301 10301 \
             --tunnel 10302 10302 --tunnel 10303 10303 \
             --upload <path1>/LittleBoPeep /LittleBoPeep \
             --launch - /LittleBoPeep --spin 3,0 3,1 3,2 3,3 -
Here tile-monitor is instructed to start a
functional simulation of a gx8016 chip and provide the system console.
A hypervisor image is created
containing gdb_module.64 and that executable will
be started automatically on all BME tiles defined in the hypervisor
configuration file. Once Linux is up and running in the simulator
LittleBoPeep is loaded and started. Given the simulator's very limited
ethernet support TCP/IP networking will not be available,
so tile-gdb will have to connect to LittleBoPeep
over a tunnel set up by tile-monitor on the host PC
and the shepherd process on the target.
LittleBoPeep is started with an additional
argument, --spin. This works around another
limitation within the TILE-Gx Linux world. When gdbstubs sends a gdb
remote protocol message or reply to LittleBoPeep over the UDN network,
there is no easy way for that UDN traffic to wake up a sleeping Linux
process. Normally LittleBoPeep polls the UDN network for incoming data
at 10 millisecond intervals, waking up every clock tick. That gives
acceptable latencies and bandwidth when debugging on real hardware.
However simulating a 10 millisecond interval takes many real seconds,
impacting gdb communication performance sufficiently badly that
tile-gdb becomes almost unusable. Running
LittleBoPeep with --spin forces it to poll
continuously for incoming UDN traffic instead of at intervals.
This will greatly improve debug performance, but of course debugging
will still be slow compared with real hardware. It should be noted
that --spin disables the code in LittleBoPeep
which detects crashed tiles, so these will no longer be reported.
Simulator, Production System
Although rarely useful, it is possible to run a production system on the simulator. As with production systems running on real hardware, the eCos configuration needs to be switched to ROM startup and rebuilt, the eCos application needs to be relinked, and tile-ecos-32to64 has to be used to convert the 32-bit executable to a 64-bit pseudo-executable which can be read by the hypervisor's BME loader.
tile-monitor --verbose --simulator --config gx8016 \
             --console --functional --gdb-port 9000 \
             --bm-debug-on-panic --debug-on-crash \
             --hvc ecos-sim.hvc \
             --mkboot-args -+- --no-strip -+- \
             --bme bmeapp=ecosapp.64
The tile-monitor options are largely the same as
when running a debug system. ecosapp.64 is used
instead of the gdbstubs gdb_module.64 file.
There is no need to upload or launch LittleBoPeep since there are no
gdbstubs instances for it to interact with, and if LittleBoPeep is not
used then there is no need to set up TCP/IP tunnels between the host
and target.
The TILE-Gx architectural HAL does provide a configuration option
which may prove useful in this
environment: CYGHWR_HAL_TILEGX_SIMULATOR. Enabling
this option causes the eCos application to trigger a backdoor provided
by the simulator. The simulation will be halted
until tile-gdb is attached to the simulator, and
information will be output on exactly how that should be done. However
note that the executable file used should be the original 32-bit one,
not the 64-bit pseudo-executable since that no longer contains any
debug information. The resulting debug session will have limited debug
functionality compared with the gdbstubs/LittleBoPeep solution, for
example it will not support thread-aware debugging, and of course the
simulator does not provide a full simulation of all the hardware.
Never the less this does provide a limited way of debugging eCos code
in a production system, which is not possible on real hardware.
Rebuilding gdbstubs and LittleBoPeep
A full release of eCos for the TILE-Gx architecture should include
prebuilt binaries of gdbstubs and LittleBoPeep. If for any reason it
is necessary to rebuild these, the process is straightforward. First,
LittleBoPeep. The source code for this is found in
the host subdirectory of the
TILE-Gx architectural HAL
package, packages/hal/tilegx/arch,
together with a makefile. Simply running make
inside that directory produce a new LittleBoPeep executable. To
rebuild a gdbstubs executable, create a new directory and inside that
directory run the following commands:
$ ecosconfig new tilegx stubs
U CYGDBG_HAL_COMMON_INTERRUPTS_SAVE_MINIMUM_CONTEXT, new inferred value 0
U CYGDBG_HAL_COMMON_CONTEXT_SAVE_MINIMUM, new inferred value 0
$ ecosconfig tree
$ make
...
At the end of the build
the install/bin subdirectory
will contain a 32-bit gdb_module.img executable
and a 64-bit pseudo-executable gdb_module.64. The
latter file is suitable for including in a hypervisor image in a debug
system.
| |  | |
| Overview |  | eCos Configuration Options |
| 2025-10-02 | eCosPro Non-Commercial Public License |